How-To Steps
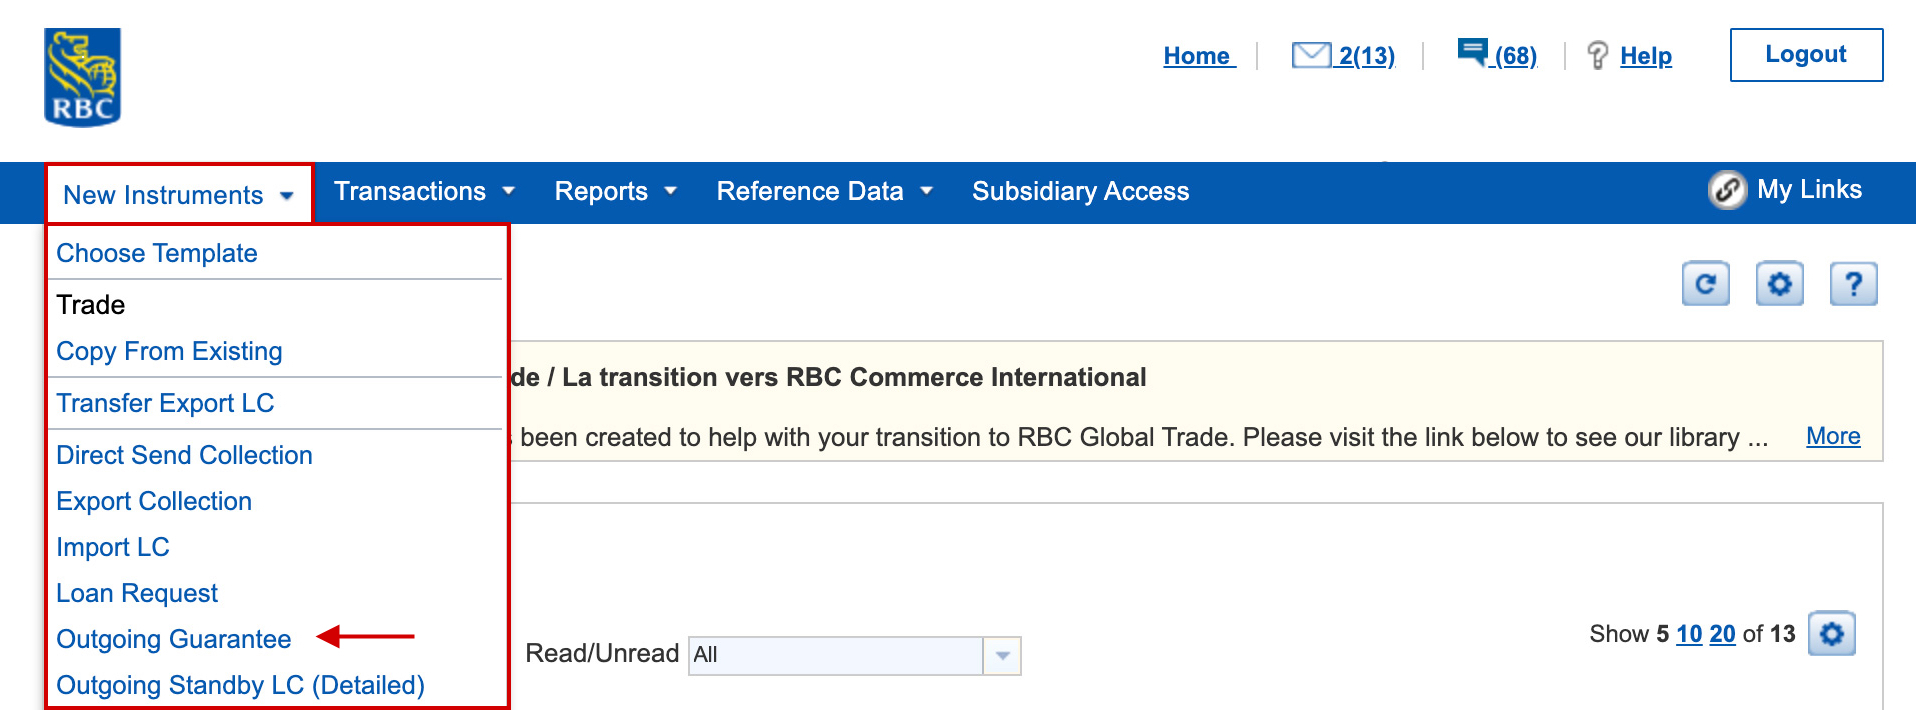
1. Select the New Instruments tab to get started
From the dropdown option select the instrument you want to apply for or make use of customizable templates , e.g. for Guarantees – select ‘Outgoing Guarantee’.
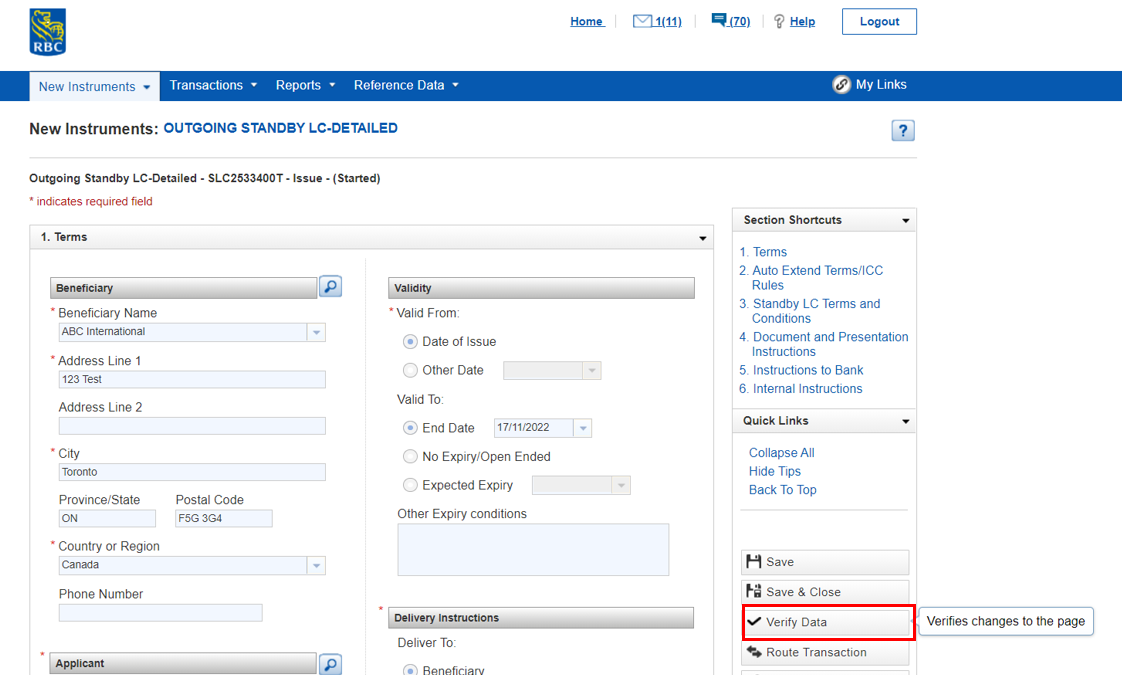
2. Complete the application
Once completed select ‘Verify Data’ option to ensure all mandatory fields have been completed.
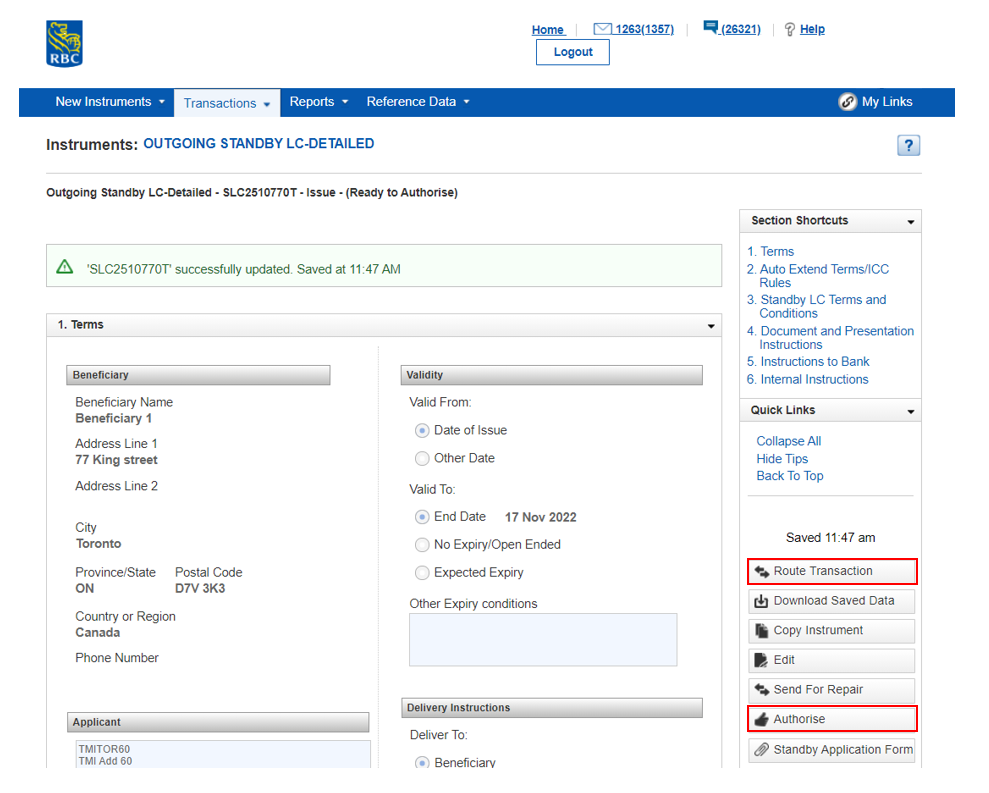
3. Select ‘Authorise’ to automatically submit to the Bank
Route transaction internally for further authorizations, if required. Click on ‘Authorise’ to submit the transaction.
Additional resources for issuing an instrument
1. Set up your home page
This is your hub for messages, notifications, transaction history and more. Access it from anywhere by clicking the Home button.

2. Check your messages and notifications
Access messages and transaction notifications from anywhere. Click the envelope or dialogue icons.

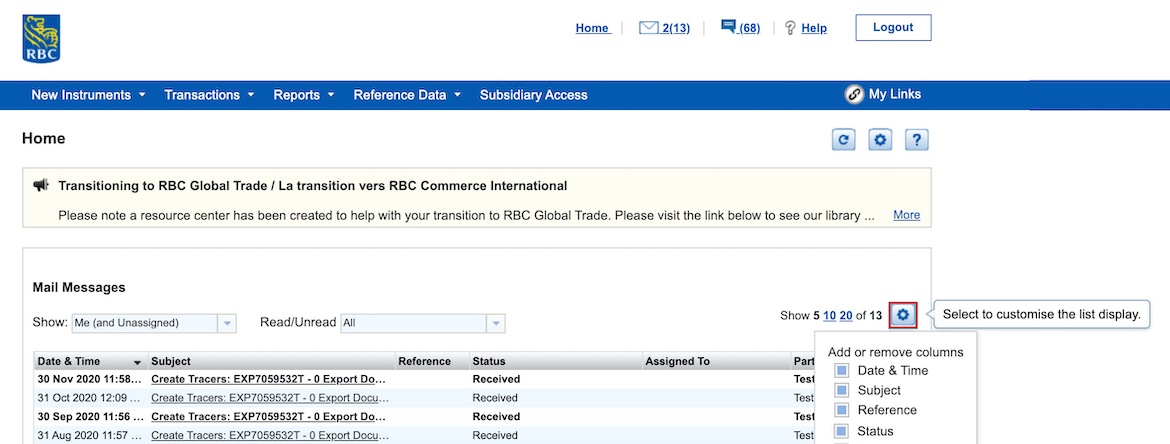
3. Customize your home page
Organize the page to suit your needs by changing your viewing options. Use the gears icon to customize your settings.
Additional resources for Home Page
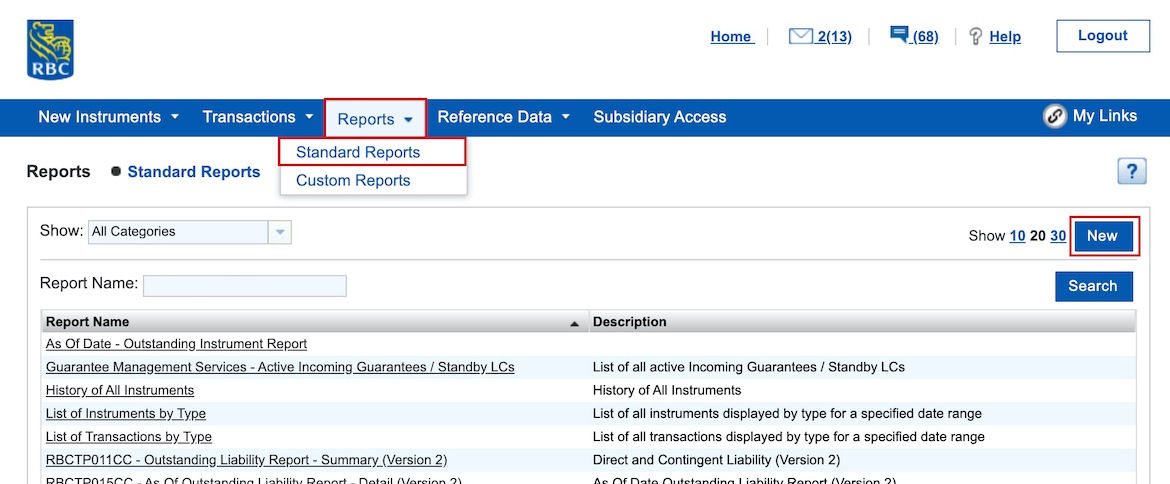
1. Access standard reports or create your own
Multiple standard reports and custom reports are available to track your transactions. Select the Reports tab.
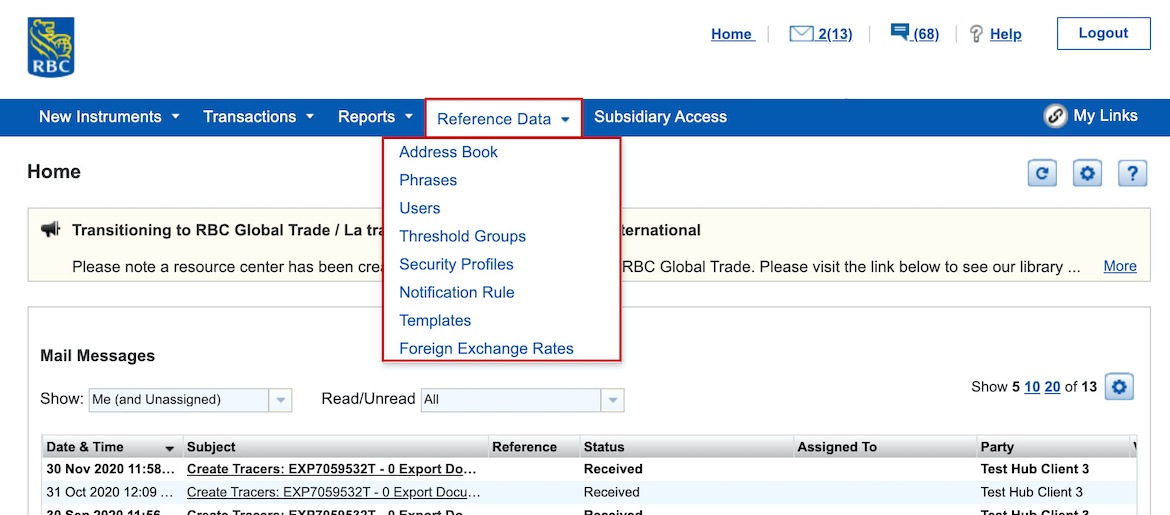
2. Customize your portal
Organize your portal account through various available settings, including users, security profiles and notification settings. Select the Reference Data tab.
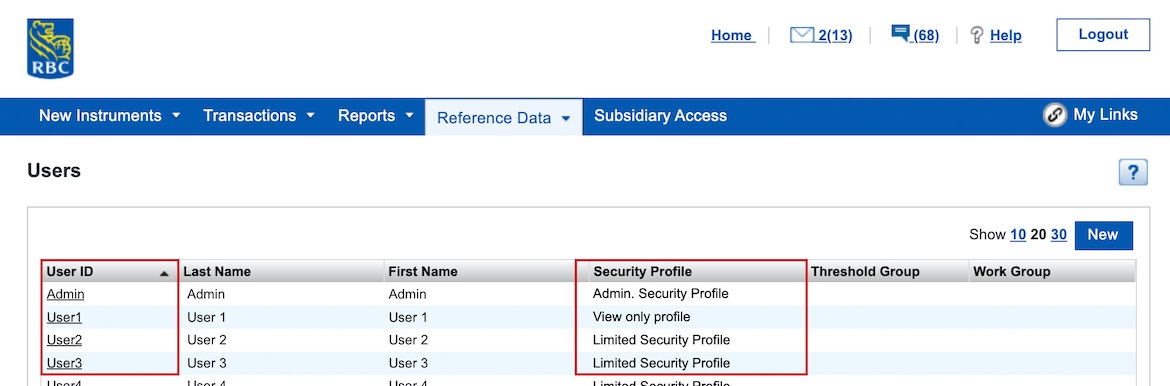
3. Create and assign multiple users
The administrator for your business can create multiple users, assign customizable security profiles and dictate specific actions and information by user. Found within the Reference Data tab.
Additional resources for Reporting and Customization


User Guides
Frequently Asked Questions
Yes. You will see a few changes in the Standby LC and Guarantee application forms. This has been carried out to match industry standards. You can refer to the videos /job aids on ‘Creating a Standby LC /Guarantee’ to understand further. For assistance please reach out to Trade Ops helpdesk at 1-800-757-4525, option 5.
For all technical and navigation support on RBC Global Trade you may contact our helpdesk at 1-800-757-4525 (Option 5).
You may see your recent transactions on the Home page, under Notifications. Click on the transaction type, (such as Issue, Advise, Commission in Advance, etc.) and you will see the related document in Section 2. Documents.
You may also view all your transactions by simply navigating to All Transactions under Transactions tab on the Home screen. Change the status to Processed by Bank and all the transactions for all your LCs will appear. As per above, click on the transaction type to view the related documents.
Please note debit advices are called Commission in Advance on the online platform.
You may view your history by navigating to History under Transactions tab. All your active/outstanding instruments will appear. You may also view your inactive/deactivated instruments by changing the status to Inactive.
When submitting transactions through RBC Global Trade, signatures are not required. Authorization is done digitally by your approved users.
You may add a new user by navigating to Users under Reference Data in the blue menu bar. Please see the Adding Users section within this User Guides: “Setting up Reference Data”.
This feature is available for Import LC, Standby LC, and Guarantee application. Once you have verified the application, a new option will appear on the right hand side of the screen labeled Import LC Application (for Import LC for example). Once you click on it, the PDF version of the application will open in a new tab.
To change your profile language you must be an admin user. As an admin user, under Reference Data > Users select your User ID. On the next screen in section 1. General select the Region Setting dropdown to specify your desired language. Finish the change by selecting Save from the right-hand menu.
If the name of one of your parties is not fitting on the first line, you may continue the name in the second line and start the address on that same line if there is enough space.
If you were not able to enter all the details in the available box, you may enter “(continued below)” in the last line for the address and then provide all the party details in the Instructions to Bank box on the application form.
RBC Global Trade allows you to enroll each subsidiary you may have and link them to your parent corporation. To access subsidiaries, click on the Subsidiary Access button found on the main action bar on the home screen. From the list of available subsidiaries, chose the subsidiary of interest, and click the Access Selected Subsidiary button. You will be taken to the Subsidiary’s Home Page where it is clearly noted at the top of the page which subsidiary you are working on behalf of. You can view subsidiary profiles only if you are provided with appropriate access as a user.
As a second authorizer, you may need to make some edits to the guarantee/LC application before sending to the bank for processing. This button will redirect the application back to the creator to make the necessary edits and resubmit to you for authorization.
You have three tries when you are accessing the platform with a login ID and password. If you enter the wrong password the first two times, your RBC Global Trade Admin user can reset your password. However, on the third try with the incorrect password, you will be locked out and will need to contact our Help Desk at 1-800-757-4525 (Option 5) to reset you.
After verifying and authorizing the application, the status will change to Authorized. For more information on the application submission process, please refer to either of the following User Guides: “Creating a new Import Letter of Credit Application” or “Creating a Standby LC or Guarantee.”
There are several features available, all dependent on your needs:
- You may create different security profiles, with specific restrictions on what the user is allowed to do—such as creating an initiator security profile, an authorizer security profile, etc.
- All clients are set up with a one user authorization, which means only one user is needed to authorize a transaction. However, you may opt for a two-user authorization as well.
- Another feature is “the last entry user must be different from the user authorizing the transaction.” This means that the last user who entered or modified the application cannot authorize it.
- There is also a security feature for admins called Dual Control. It means that two admins are required to approve creating or modifying user details.
- For any assistance with any of the above features, please contact our help desk.
Yes, you may receive emails for everything that appears under Notifications and Mail Messages on the home page. Please click on Reference Data and Notification Rule. If there is one existing already, you may modify it to add or delete users and, if there is nothing, click on New to create a notification rule. You may contact the helpdesk for assistance with this set up.
Anytime you click on one of the products under New Instruments, a new instrument or transaction will start. If you have created any in error, you may delete them by clicking on Transactions > Pending Transactions > then select the instruments you want to get rid of and click Delete.
Route Transaction is used when one user requires authorization from another to submit a transaction. Please see the Route Transaction section within either of the following User Guides: “Creating a new Import Letter of Credit Application” or “Creating a Standby LC or Guarantee”. However, please note routing a transaction will not generate an email to the other user to notify them that a transaction is pending.
A trade officer may return a transaction (that you have authorized) back to Portal upon your request, or if there is some modification required on the form. Once you open the transaction on Portal, the reason for returning it will display at the top of the form. Once the modifications are done, please verify and authorize the transaction to send it back to us.
From the Home page, select Reference Data > Address Book. From here, you can see all existing Parties and can select New to create a new Party. Simply fill in the required fields in Section 1 only and save. After saving, the new Party will be visible when creating new applications to be selected as an Applicant or Beneficiary (pending the scenario).
You may also do the above while in the middle of filling up an application by clicking on the search button beside the Applicant or Beneficiary box and clicking on New. Once all the information is entered for the new Applicant or Beneficiary, click on Save and Close to return to the application form.
For security purposes there is a system-wide 10 minute timeout for inactivity that may log you out. Please continuously save your work so as not to lose any data.
You can create mail messages from RBC Global Trade to communicate directly with RBC. Simply click on the envelope icon on top of the page and then select the New button to create a new mail message. If required you can route the mail message internally and/or add attachments before sending to RBC.
Start Using RBC Global Trade
Not Enrolled? Sign Up Today for RBC Global Trade
Need Additional Help?
If you have any questions, please contact our Help Desk at 1-800-757-4525 (option 5)
You may also be interested in
RBC Global Connect
Access comprehensive information, tools and a global network of business partners through a platform designed to help businesses go global.
View Legal DisclaimersHide Legal Disclaimers