Help Topics Covered in This Section
Initiate a Payment Order
What is a payment order?
A Payment Order is the request by an authorized RBC PayEdge user to execute a payment transaction. It can be a single payment or a list of payments that will be sent for processing in a single batch and can include payments to multiple Suppliers, in multiple currencies and Payment Methods.
There are four ways to initiate a Payment Order:
- From the dashboard, select Payments > New Payment Order. Add payments to the order via File Upload, Import from accounting software or manual input.
- From the Dashboard, select ‘Create Payment Order’ on the bottom right-hand side of the screen. Add payments to the order via File Upload, Import from accounting software or manual input.
- From the dashboard, select Payments > Outstanding Payables. Check the box next to the payments you wish to add to your order and then Actions > Create New Order.
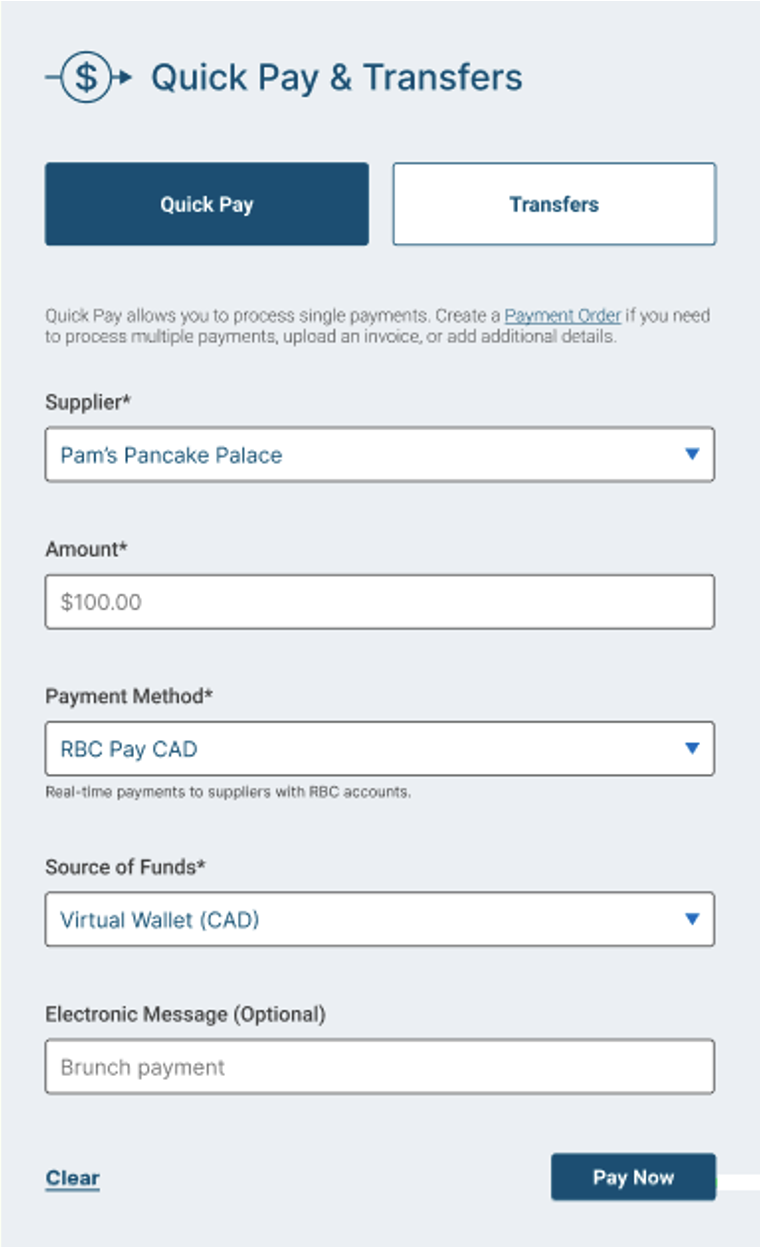
- Using the Quick Pay & Transfers function on the Dashboard. Refer to Quick Pay section for details on how to make a single payment using Quick Pay.
Add Bills and Payments to a Payment Order Manually
- From the Payment Order Details Screen, add payments by manually inputting the details required.
- Select supplier from the dropdown, add amount and remittance notes.
- Select payment method from the dropdown. You will only see the payment methods that you have added for that specific supplier.
- Upload an invoice if required.
- Click ‘Add’.
- Repeat for all payments you would like to include in the Payment Order.
- Click ‘Save & Continue’.
- You will then be directed to select the source of funds, processing date and acknowledge the fees before the payment is routed for approval.
Add Bills and Payments to a Payment Order using CSV File Upload
- From the Payment Order Details Screen, click ‘Upload File’.
- Download the RBC PayEdge CSV template by clicking ‘Download here’. The template will populate with all your suppliers and their payment methods.
- Input your desired payment amount into the Payment Amount Column for any suppliers you are paying. Ensure you enter the amount next to the specific payment type you want, as there may be multiple rows for each supplier.
- Enter remittance notes in the Payment Details column if you have any.
 Note: Only populate the cells next to the Suppliers you wish to pay;
leave all others blank.
- Save the completed template locally on your computer.
- Click ‘Upload File’, locate the file on your computer and click ‘Open’.
- The name of the file should appear in the text box. Click ‘Create Payment Order’.
- The screen will display the Received Data. Review to confirm accuracy.
- Click ‘Import’.
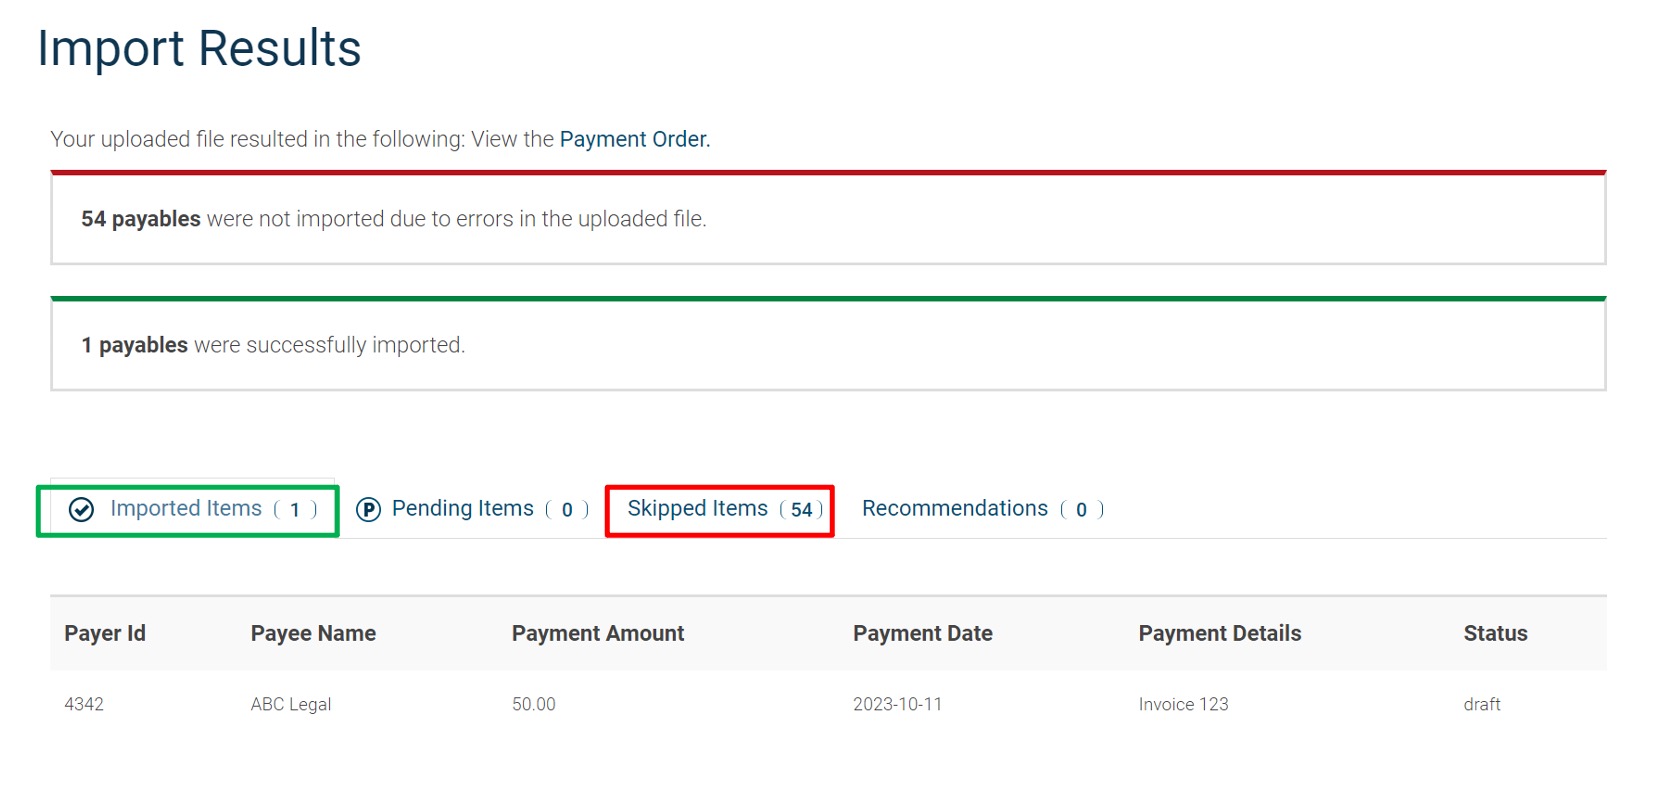
- The screen will display the Import Results, which will show the payables to be
included in
the Payment Order (displayed in the ‘successfully imported’
notification and on the
‘Imported Items tab’). The platform will also note the number of
suppliers which are not being included in the Payment Order (displayed on the
‘Not imported’ notification and the
‘Skipped Items Tab’).

- Click ‘View the Payment Order’ at the top of the screen.
- Review the List of Payments to ensure accuracy (amount, method of payment, remittance notes). To make changes or add an invoice to any payment, click Actions > Edit. Click ‘Save’ once done.
- Once all payments are complete, click ‘Save & Continue’.
- You will then be directed to select the source of funds, processing date and acknowledge the fees before the payment is routed for approval.
Add Bills and Payments to a Payment Order by Importing Approved Bills and Payments from your Accounting Software
Note: This method only works if you have successfully connected your accounting software to RBC PayEdge.
Initiate a Sync to Import Approved Payables:
- To import approved payables from your accounting software into RBC PayEdge, initiate a Sync by clicking ‘Sync’ on the main dashboard or on the Third Party Integrations page.
- Modify the date range for the sync by updating the ‘From Date’ before clicking ‘Sync’.
- All imported payables will now be viewable in the Outstanding Payables list.

Note: if this is the first time you are importing a payment for a supplier, you will need to add a payment method and account details for that supplier.
Add the Imported Payables to a Payment Order:
- From the Payment Order Details Screen, click ‘Import’.
- Check the box next to the payables you would like to include in the Payment Order. Those which were imported from your accounting software can be identified as they will say ‘via (accounting software name)’ under the Date Received.
- Click ‘Add to Order’.
- You can also create a Payment Order by selecting the imported payables from the Outstanding Payables list (Payments > Outstanding Payables).
- Check the box next to the payables you would like to include in the Payment Order. Those which were imported from your accounting software can be identified as they will say ‘via (accounting software name)’ under the Date Received.
- Once all payables are selected, click ‘Actions’ > create new order.

- The selected payables will appear in the List of Payments. All details from your accounting software will be brought over, including invoices if attached.
- Review to ensure accuracy.
- To make changes or add/edit an invoice to any payment, click Actions > Edit. Click ‘Save’ once done.
- Once all payments are complete, click ‘Save & Continue’.
- You will then be directed to select the source of funds, processing date and acknowledge the fees before the payment is routed for approval.
Quick Pay & Transfers
The Quick Pay & Transfers feature on the main dashboard can be used to make single payments to suppliers, transfer funds instantly to your existing RBC accounts, or to fund your virtual wallet.
To Use Quick Pay & Transfers:
- Input details on supplier, payment method, funding source and amount.
- Click Pay Now, and confirm fees.
- The payment will still be routed for approval as required.


